Welcome to our website !

Easy to make 3-Dimensional paper snowflakes with a vintage feel by up cycling old book pages, look beautiful hanging on a wall or in a window. They are fun for kids or adults ...


Because when it comes to parenting, any help (small or big) will help. So here are nine wonderful tips and hacks to make life a little easier, mum and dad ...


In this video tutorial, Ben shows us how to make a series of stools that fit together like a puzzle ....


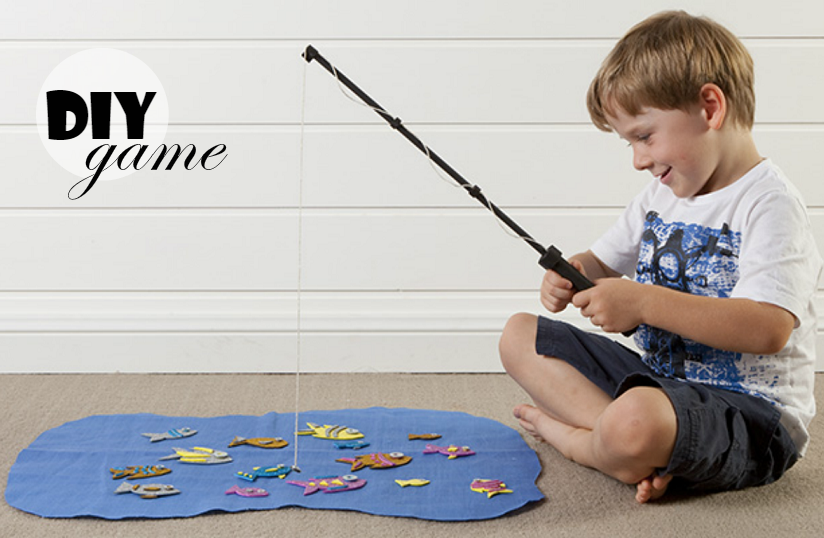
Make a fun fishing game for the kids with this easy craft idea. Get the kids involved, use Tara's free template and get creative decorating your fish or use the printable fish. Have fun fishing ....

You will need:
  • Colored and black foam sheets
  • Scissors
  • Craft glue
  • Printable fish template
  • Dowel rod
  • Black paint
  • Masking tape
  • String
  • Magnates
  • Washers - various sizes

Fishing Rod Base
Cut your rod to length with a hand saw and paint it with a black acrylic color.


Fishing Rod Handle
Before adding the handle to your rod, glue on your fishing string.
Cut a black piece of foam to size. Tara's measures 140mm high.
Glue and wrap the foam around the rod making sure it covers where the string has been attached.
Cut two small strips of foam and glue these around the bottom and top of the handle. This will create a real fishing rod feel to the grip.


Fishing Rod Loops
Cut small strips of foam and wrap them around the rod and string. One at half way, one 3/4 and one at the very top.
These will hold the string in place. Let the string hang loose between these loops.


Magnets
Slip a washer onto the end of the string. Glue the string to the magnet and glue the washer over the string. The washer will hold the string closer to the center of the magnet meaning the magnet will hang flat. This will make it easier to pick up the fish.


Make Your Fishes
Print off your template and the fish out of your colored foam sheets. You'll find scissors work really well on these sheets.
Decorate Your Fish. Add a washer to the eye of the fish, this is so you can catch them.

Make Your Pond
Tara cut a pond from a piece of fabric, but felt or cardboard would work as well.
Once everything is dry you can head off and go fishing.

Tara's Top Tips Some magnets are only magnetic on one side and repel on the other. Therefore make sure you attach it so the magnetic side is facing the right way to pick up the fish.

Source

Dreaming of having kids with him? Take this quiz to find out what kind of dad he'll be ....


Here are 10 storage ideas to organize your kid's room, furthermore they're cheap and easy to create in a very little time ....

Mounds of Buckets


Hanging Bedside Organizer


Vintage Crates


Easy Book Storage


Milk Jug Toy Scoops


Pegboard Organization


Hoopla Storage


Toy Planters


Rain Gutter Bookshelves


DIY Under Bed Storage


The classic garland graduates from cute craft to creepy decor with this template for spiders.

Steps

  1. Cut a 5''W x 18''L strip from a 12''W x 18''L sheet of construction paper. Measure in three inches from one of the five-inch ends and mark. From there, measure and mark four more times.
  2. Fold paper at the first mark. Then flip over and fold again at the next mark. Keep flipping and folding, making an accordion shape.
  3. Print the spider template and cut as directed.
  4. Center it atop the folded paper, and trace around the shape with a pencil.
  5. Carefully cut out the shape, going through all the layers of folded paper, and unfold to reveal. To create a longer row, repeat steps and adhere garlands together with tacky glue.

Source

Lisa gives us in this video a step-by-step tutorial on how to draw a haunted house. You can use this tutorial to create a Halloween banner, a cards, or any other decoration ....


Image

Your little devil will be ready for trick-or-treating in no time with this easy, no-sew Halloween costume.

You need
  • Red sweatshirt
  • Fabric glue
  • 1/2 yard red ribbon
  • Large safety pin
  • Red marabou boa
  • 1 yard red felt
  • Straighten metal hanger
  • Red rubber glove
  • Cotton balls
  • Red headband
  • Red glitter
  • Red paint
  • Wooden dowel
Body

Start with the sweatshirt and cut off the sleeves 3 inches from neck; glue raw edges under. Cut a 4-inch slit down the back, starting at the center of the neck. Attach ribbon to a safety pin and thread it through neck casing (you'll use the ends to tie a bow). Glue marabou to the neck and trim excess.

Tail

Cut two triangles from left, about 3 inches high and 3 inches wide at the base. Then cut a strip of felt about 4 inches wide to desired length. Fold strip in half lengthwise and glue edges; let dry, then turn inside out. Push straightened metal hanger through the tail and glue the triangles together over the tip. Glue the other end to the back of the sweatshirt. Wrap a small piece of marabou around base.

Horns

Cut two fingers off rubber glove and stuff with cotton balls. Coat with glue and cover with red glitter. Glue the headband. Pitchfork: Cut two pieces of red felt into a pitchfork shape. Glue edges together leaving a small opening at the bottom center, once dry, stuff with cotton balls and dust with red glitter. Paint a wooden dowel red. Once dry, place fork on the stick and glue together.

Source
Image 

In the following video you will learn how to make an easy and fun Trick or Treat candy bag for your kids to use on Halloween. This same bag can be embellished or decorated any way you want and be used for a ton of other purposes.


It's creepy and it can also be scary, but most of us do love 'Halloween' for the food, games and activities, the costumes and of course, what little monster doesn't enjoy trick-or-treat. So this year why not celebrate Halloween by turning your home into a 'Haunted' attraction with these easy DIYs ....
Ghost (source)


Halloween Chandelier (source)


Tin Can Luminaries (source)


Little flying Bats (source)


Halloween Silhouettes (source)


Ghostly Draperies (source)


Glittery Pumpkins (source)


Floating Witch Hats (source)


Foam Halloween Tombstones (source)


Flying Bat Wreath (source)


Paper Mice (source)


Spooky Potion Bottles (source)


Zombie Planted Hands (source)


Spooky Village (source)


Hanging Ghosts (source)


Follow the step-by-step tutorial in the following video to learn how to make pinwheels that actually spin. This is a very easy and quick tutorial ....


Image

Here are some adorable DIY ideas for your kid's room ....

A Beautiful Bed For A Girl


Indoor Tee Pee


Birdhouse Lamp


Rolling Bookshelf


Use An Old Pallet To Make An Indoor Swing


DIY Mushroom Chairs Out Of Wood And Pillows


Make A Bed With Old Pallets


Hang Curtains On A Wooden Branch


Use Skateboards As Shelves


Organize Your Kid's Socks


Make A Drawing Board


Awesome Way To Use Your Kid's Socks


A Lovely Nightstand For A Princess